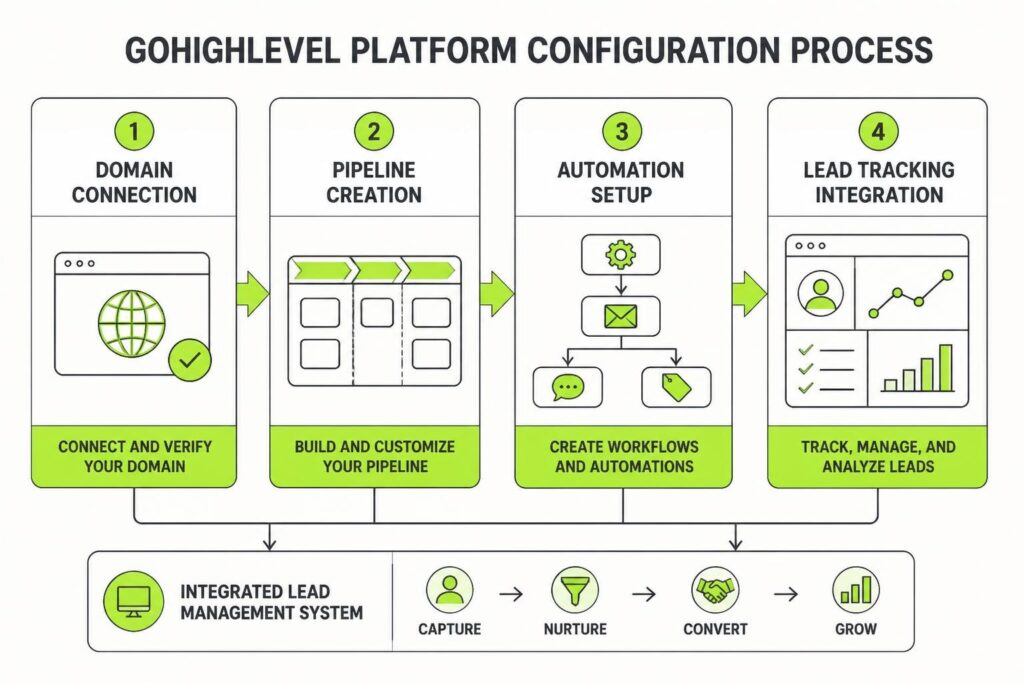
Setting up GoHighLevel for your service business isn't difficult, but it's easy to skip steps that matter later. A proper ghl setup checklist keeps you from rebuilding pipelines, resending DNS records, or losing leads because a form wasn't connected. The difference between a system that compounds growth and one that creates more work comes down to doing the boring stuff correctly at the start. This guide walks through the setup tasks that actually matter, in an order that saves backtracking.
Why a GHL Setup Checklist Matters
Most agencies and service businesses buy GoHighLevel, poke around the dashboard, build a funnel, then realise three weeks later they forgot to set up DMARC or map custom values. Then leads start falling through cracks.
A structured checklist solves three problems:
- Prevents rework: Configure foundational settings once, properly, so you don't rebuild later.
- Protects deliverability: Email authentication and domain setup aren't optional if you want inbox placement.
- Creates accountability: When multiple people touch the account, a checklist keeps everyone on the same page.
Without a checklist, setup becomes ad hoc. You remember the fun stuff (building automations, designing pages) and forget the invisible infrastructure that protects lead flow and data integrity.
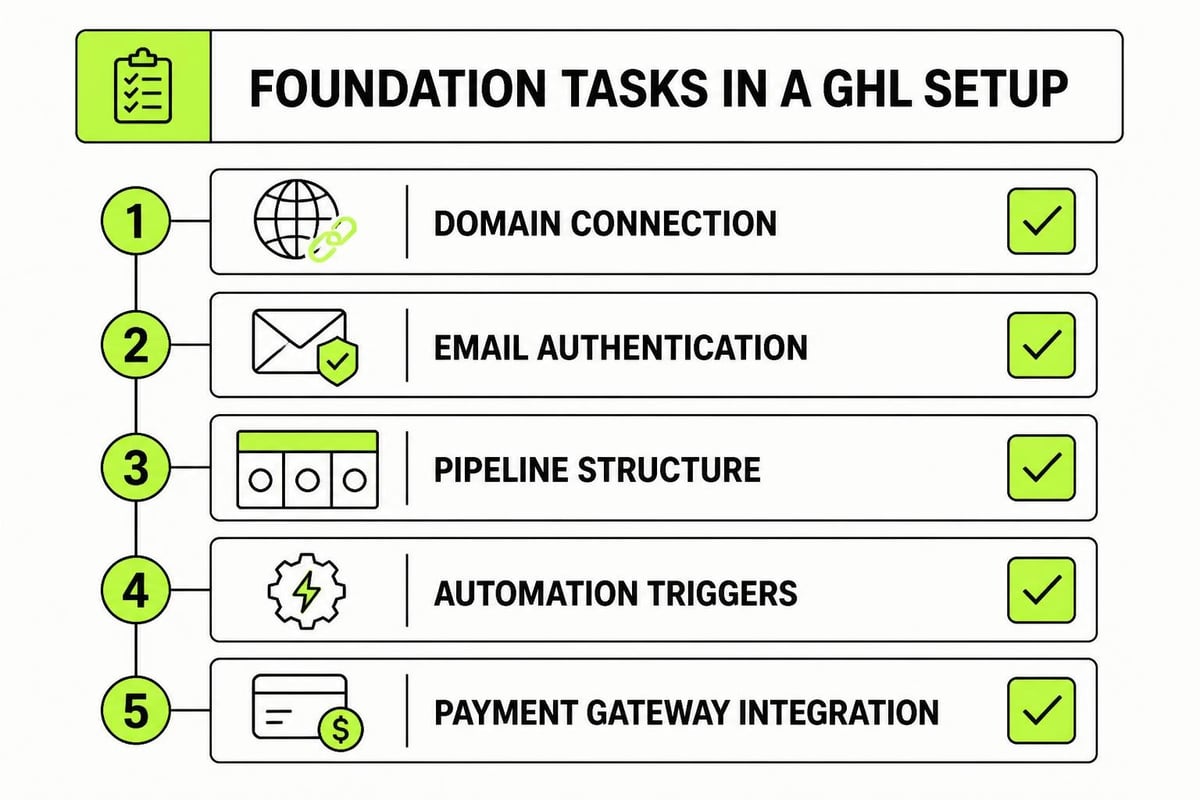
Pre-Setup: What You Need Before Logging In
Don't open GoHighLevel until you've sorted these basics. Trying to configure domains or payments mid-setup just slows everything down.
Domain and DNS Access
You need a domain (or subdomain) dedicated to GHL, plus login credentials for your DNS provider. Most service businesses use a subdomain like app.yourbusiness.com.au or go.yourbusiness.com.au for funnels, forms, and client portals.
Prepare these details:
- Domain registrar login (GoDaddy, Cloudflare, Crazy Domains, etc.)
- Confirmation the domain isn't locked or pending transfer
- Access to add A, CNAME, TXT, and MX records
If you're using Google Workspace or Microsoft 365 for email, you'll also need admin access to add SPF, DKIM, and DMARC records. The official GoHighLevel domain connection guide covers the exact records you'll add.
Payment Gateway Credentials
If you plan to take payments through GHL (course sales, booking deposits, retainers), have your Stripe or PayPal account ready. Integrating a payment gateway properly requires API keys, webhook URLs, and a test mode before going live.
Branding Assets
Gather logos (SVG or high-res PNG), brand colours (hex codes), and any templates or style guides. You'll add these during white-label setup and page builder configuration. Having them ready avoids hunting through Canva files mid-build.
Domain and Email Authentication Setup
This is the least exciting part of any ghl setup checklist, and also the most important. Get DNS and email authentication wrong and your carefully designed nurture sequences land in spam.
Connect Your Domain
Log into GHL, navigate to Settings > Domains, and add your chosen domain or subdomain. GoHighLevel will generate DNS records: usually an A record pointing to their server IP and a CNAME for www.
Copy these records exactly. Log into your DNS provider and paste them in. If you're using Cloudflare, turn off the orange proxy cloud (set to DNS only) until the domain verifies. The GoHighLevel support article on configuring purchased domains includes screenshots for common providers.
Verification typically takes 10 to 60 minutes. Don't move on until the green tick appears in GHL. Trying to build funnels on an unverified domain just creates broken links later.
Add SPF, DKIM, and DMARC Records
Email authentication protects your sender reputation. Without it, Gmail and Outlook treat your emails as suspicious, even if your copy is flawless.
| Record Type | Purpose | Where to Add |
|---|---|---|
| SPF | Lists servers allowed to send on your behalf | DNS provider (TXT record) |
| DKIM | Adds encrypted signature to verify message origin | DNS provider (TXT record) |
| DMARC | Tells receiving servers what to do with unauthenticated mail | DNS provider (TXT record) |
GoHighLevel provides SPF and DKIM records under Settings > Email Services > Authentication. Add them to your DNS exactly as shown. For DMARC, Google Workspace offers clear guidance on setting up DMARC that applies regardless of your email host.
Start with a DMARC policy of p=none (monitor mode), then tighten to p=quarantine or p=reject once you've confirmed legitimate mail is passing.
Account Structure and User Permissions
A messy account structure slows everything down. Decide now how you'll organise sub-accounts, pipelines, and users so you're not untangling it later.
Sub-Account Strategy
If you're an agency managing multiple clients, create a sub-account for each. If you're a single service business, you might still use sub-accounts to separate divisions (e.g., coaching vs. consulting) or test environments.
Best practice: Keep one sub-account as a template. Build your standard pipelines, automations, and forms there, then snapshot and clone it when onboarding a new client or launching a new offer. Saves rebuilding from scratch every time.
User Roles and Permissions
Add team members under Settings > My Staff. Assign roles carefully:
- Admin: Full access, can delete and modify billing. Limit to owners and senior operators.
- User: Can create and edit campaigns, funnels, contacts. Standard for marketers and account managers.
- Read-Only: Can view data but not change settings. Useful for reporting access.
Don't give everyone admin. The fewer people who can accidentally delete a live funnel, the better.
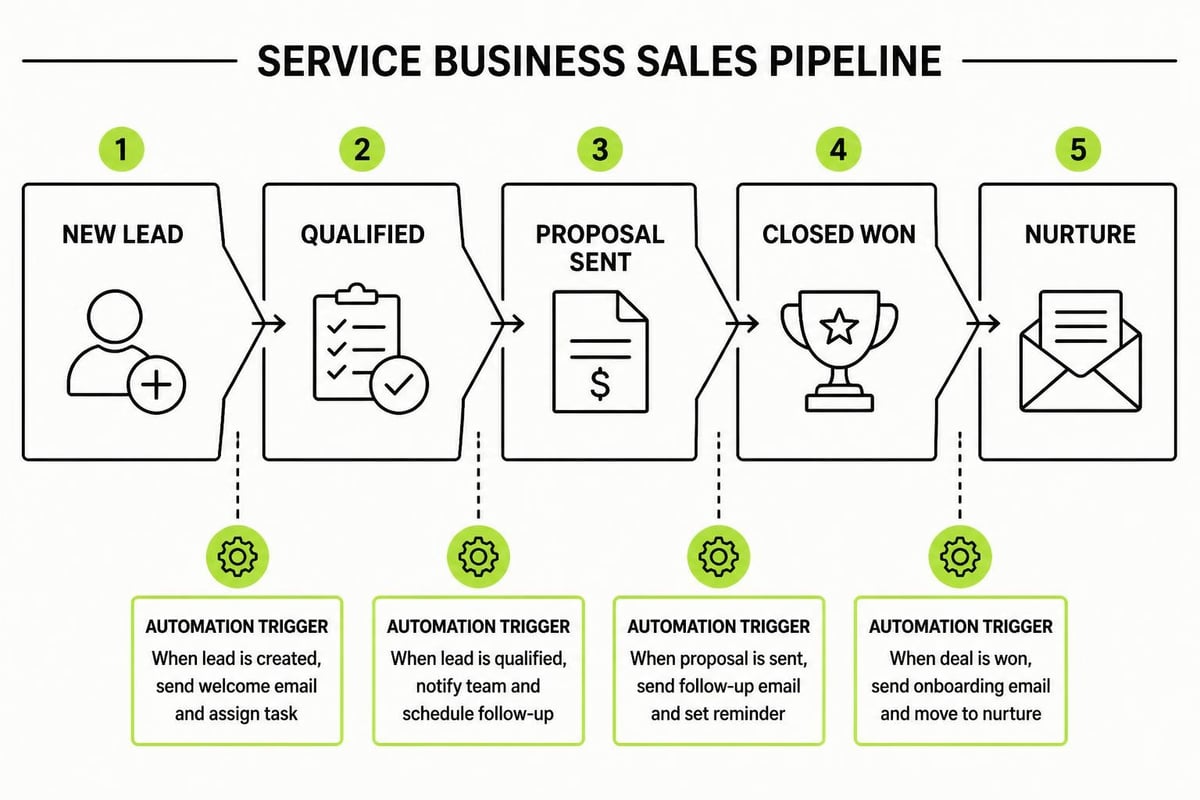
Pipeline and Opportunity Setup
Pipelines are where GHL shines. They track every lead from first contact to closed client, and trigger automations at each stage. Your ghl setup checklist should include building at least one core pipeline before going live.
Design Your Pipeline Stages
Map your actual sales process, not an idealised version. Most service businesses need something like:
- New Lead – Form submission or inbound inquiry
- Contacted – First call scheduled or held
- Qualified – Budget, need, and timeline confirmed
- Proposal Sent – Quote or scope delivered
- Negotiation – Follow-up or objection handling
- Closed Won – Client onboarded
- Closed Lost – Archived
Each stage should represent a real milestone. Don't create stages you'll never use; they just clutter reporting.
Add Custom Fields and Tags
Custom fields let you store client-specific data (industry, deal size, lead source). Tags let you segment and automate (e.g., "High Intent," "Nurture," "Referral").
Create custom fields for anything you'll need in reporting or filtering:
- Lead source
- Service interested in
- Budget range
- Referral partner
Tags are easier to bulk-apply and search, so use them for short-term flags like "Hot Lead" or "Attended Webinar."
Forms, Calendars, and Lead Capture
You can't nurture leads if you're not capturing them properly. Forms and calendars are the entry points to your CRM, so they need to work flawlessly.
Build Your Core Forms
Create a lead magnet form, a contact form, and a booking form at minimum. Use GHL's form builder under Sites > Forms.
Checklist for each form:
- Map all fields to contact record properties (name, email, phone, etc.)
- Set the pipeline and stage where new submissions land
- Add a webhook or automation trigger for instant follow-up
- Test the form on mobile and desktop before publishing
- Confirm confirmation emails are sending (and not landing in spam)
If you're running ads or content campaigns, building a repeatable marketing system often starts with one strong opt-in form and a simple nurture sequence behind it.
Configure Calendar and Booking Links
Set up a calendar under Calendars > New Calendar. Connect your Google or Outlook calendar to avoid double-bookings, set your availability hours, and add buffer time between meetings.
Pro tip: Create separate calendars for different services (e.g., "Strategy Call," "Onboarding Session") so you can track conversion rates and automate follow-ups based on which type of appointment someone booked.
Automations and Workflows
Automations are why you bought GHL. The platform can send texts, emails, update pipeline stages, assign tasks, and trigger webhooks without you lifting a finger. But only if you build the workflows correctly.
Start With Three Core Workflows
Don't try to automate everything on day one. Build these three, test them, then expand:
- New Lead Workflow – Fires when someone fills a form. Sends a confirmation email/SMS, assigns the opportunity to a sales rep, and schedules a follow-up task.
- Missed Call Workflow – Fires when a call goes unanswered. Sends an automated SMS: "Sorry we missed you. Reply here or book a time: [calendar link]."
- Pipeline Stage Workflow – Fires when an opportunity moves to "Proposal Sent." Sends a follow-up email three days later if no reply, then again seven days later with a "Shall I close this?" message.
Each workflow should have a clear trigger, a single goal, and an end state. Avoid creating loops or nested conditions until you've tested the basics.
Test Before Activating
Create a test contact, run them through each workflow, and confirm every email, SMS, and task fires as expected. Check that links work, merge fields populate, and delays are correct. Nothing's more embarrassing than a client receiving a garbled email because you forgot to map {{contact.first_name}}.
When setting up payment collection or data handling, remember that security basics still apply. The OWASP database security cheat sheet reminds us that even on a managed platform, you're responsible for access controls, backups, and data minimisation.
Integrations and Third-Party Connections
GoHighLevel connects to hundreds of tools via Zapier, webhooks, and native integrations. Add the ones your business actually uses, not every option available.
Essential Integrations to Configure
| Tool | Purpose | Setup Priority |
|---|---|---|
| Google/Outlook Calendar | Prevent double-bookings | High |
| Stripe/PayPal | Process payments | High (if selling) |
| Zapier | Connect non-native tools | Medium |
| Facebook Lead Ads | Auto-import ad leads | Medium (if running ads) |
| Slack or Teams | Internal notifications | Low (nice to have) |
For each integration, document the API keys, webhook URLs, and trigger conditions. Store them in a password manager or internal wiki. When someone leaves your team or you need to troubleshoot six months later, you'll be glad you did.

If you're still figuring out which tools to connect and how they fit together, a clear 7-Step Marketing Plan helps you see where GHL sits in your broader lead generation and nurture system. Most service businesses don't need every integration; they need the handful that close the gaps between attention and conversion.
Tracking, Analytics, and Reporting
You can't improve what you don't measure. Set up tracking and reporting during initial setup, not as an afterthought.
Enable Conversation AI and Call Tracking
Under Settings > Phone Numbers, purchase or port a tracking number. Set up call recording (with proper consent notifications) and enable AI transcription if your plan includes it. This data feeds your pipeline reporting and helps train your team on what objections come up most.
Build a Weekly Dashboard
GHL's reporting tools let you create custom dashboards. Build one that shows:
- New leads by source
- Pipeline conversion rates (stage to stage)
- Calls made/received
- Emails sent and opened
- Appointments booked and held
Export this weekly and review with your team. Consistency compounds growth, and you can't stay consistent without visibility into what's working.
Set Up Attribution Tracking
Add UTM parameters to every marketing link (ads, emails, social posts). When someone clicks and converts, GHL captures the source in their contact record. Over time, you'll see which channels bring in the highest-value leads, not just the most traffic.
Security and Compliance Tasks
This section never makes it into the "fun" part of a ghl setup checklist, but skipping it puts your business at risk.
Enable Two-Factor Authentication (2FA)
Under Settings > My Profile, enable 2FA for every user with admin or user-level access. SMS-based 2FA is better than nothing; app-based (Google Authenticator, Authy) is better still.
Review Data Retention and Backup Policies
GHL backs up your data, but you should periodically export contact lists and critical automations. Store encrypted backups offsite. If you operate in the EU or serve EU clients, document your data retention policy and confirm it meets GDPR requirements.
The NIST checklist program guide outlines how to build and maintain secure configuration checklists for IT systems. It's overkill for a small agency, but the principles (version control, regular audits, documentation) apply to any platform holding client data.
Document Access and Change Logs
Keep a simple spreadsheet or doc listing who has access, when they were added, and what permissions they hold. When someone leaves, revoke access immediately and rotate any shared API keys or credentials they had.
White-Label and Branding Configuration
If you're using GHL for clients, white-labelling hides the GoHighLevel branding and replaces it with yours. Even if you're just using it internally, a polished interface builds trust with your team.
Upload Logos and Colours
Under Settings > White Label, upload your primary logo, favicon, and login page background. Set your brand colours (primary, secondary, accent) so every page builder and email template defaults to your palette.
Customise Email Footers and Sender Info
Replace the default "Powered by GoHighLevel" footer with your own business name, address, and unsubscribe link. Set the default sender name and reply-to address under Settings > Email Services so outbound emails don't confuse recipients.
Test the Client-Facing Experience
If clients will log into GHL (for reporting, calendars, or course access), create a test login and view it as they would. Make sure branding is consistent, navigation is intuitive, and there's no GoHighLevel mention anywhere.
Post-Setup Testing and Validation
You've ticked every box on the ghl setup checklist. Now test the whole system end to end before going live.
Run a Full Lead Flow Test
- Fill out your lead form as a new contact.
- Confirm the automated email/SMS arrives within 60 seconds.
- Book a test appointment on your calendar.
- Move the test opportunity through each pipeline stage.
- Confirm every workflow triggers correctly.
- Check that tasks, notifications, and pipeline updates all fire.
If anything breaks, fix it now. Don't discover gaps when a real lead is waiting.
Check Deliverability and Spam Scores
Send test emails to Gmail, Outlook, Yahoo, and a spam-testing service like Mail-Tester. Confirm they land in the primary inbox, not promotions or spam. If your score is below 8/10, revisit your SPF, DKIM, and DMARC setup.
Review Mobile Experience
Half your leads will interact on mobile. Open your forms, booking pages, and email templates on a phone. If something looks broken or requires horizontal scrolling, fix it. GHL's drag-and-drop builders are mobile-responsive by default, but custom code or wide images can break layouts.
Documenting Your GHL Setup for the Team
A ghl setup checklist isn't just for the initial build. It's a living document your team refers to when onboarding new clients, launching new campaigns, or troubleshooting issues.
What to include in your internal GHL playbook:
- Login credentials (stored securely, not in the doc itself)
- DNS and domain configuration details
- Standard pipeline structure and stage definitions
- List of active automations and what triggers each
- Integration credentials and setup notes
- Weekly reporting schedule and KPIs to track
Store this in a shared workspace (Notion, Google Drive, Confluence) and update it whenever you make a change. When someone asks "How do we add a new user?" or "Why did this workflow stop firing?", the playbook should answer it.
Ongoing Maintenance and Audits
Setup isn't a one-time event. Plan quarterly audits to keep your GHL account clean, secure, and optimised.
Quarterly Checklist
- Review and archive inactive contacts (GDPR and deliverability)
- Check that automations are still firing correctly
- Update any expired API keys or integrations
- Review user permissions and remove ex-staff
- Export a backup of contacts, pipelines, and automations
- Test all lead capture forms and booking calendars
- Review email deliverability and spam scores
Think of it like servicing a vehicle. Regular maintenance prevents the big breakdowns that cost time and money.
A proper ghl setup checklist removes the guesswork from configuring GoHighLevel. When domains, DNS, pipelines, automations, and tracking are all locked in from the start, you spend less time troubleshooting and more time converting leads. If you need help building a CRM and automation infrastructure that actually protects your lead flow and creates structured growth, MDO Digital can help. We specialise in removing chaos from marketing systems so service businesses can scale with clarity.